• Skip to primary navigation
  • Skip to main content
  • Skip to primary sidebar
  • Skip to footer

CATIA V5-V6 Tutorials

Tips and tricks, tutorials and workflow

  • CATIA tips and tricks
  • CATIA V5 Tutorials
    • Assembly
    • DMU Kinematics Simulator
    • DMU Navigator
    • DMU Space Analysis
    • Drawing
    • General Structural Analysis
    • Generative Shape Design
    • Part Design
  • How to
  • Video tutorials
  • About
  • Contact
You are here: Home / How to / How to capture screenshots in CATIA V5

How to capture screenshots in CATIA V5

06/10/2016 by Joe 1 Comment

Capture screenshots in CATIA V5 is very easy to be done. The how-to process takes only few seconds and the results is very good if you know to use the settings of Image Capture.

The command is called Capture and it’s available on Tools -> Image. The command has many options, I will present only a part of them, the most used.

capure-image-catia-v5

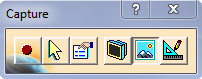
First button is Capture but it’s used last, because we need to configure the settings of this command, so I will go to 3rd command, named Options.

Here, in first tab General, you can change the Color mode in tree options, Color, Grayscale and Monochrome. Another great function here is Capture only geometry, that is used to take photos only to part geometry (so we not have the Tree and Compass). In the Pixel tab you can check the box of White background, where you can take screenshots with white background. The most important feature of Capture function in CATIA V5 is Rendering quality, because with this you can change the resolution of screenshots up to 30.000 width in pixels. The resolution change is available if you select Customized.

Second button, Select Mode, allows you to select the region of a screen to be prepared to be captured.

The last two command of Capture are Pixel Mode and Vector mode. I always use the Pixel mode to take screenshots because I like to have high quality results.

Back to first button. This button starts the screen capture and allows you to: delete the screen captured, save the screen, print, copy or save in to an album. I use frequently the copy function because, I can use paste directly to a Power Point presentation for example. If you need only to save a image to be saved locally you can use save button.

Below I make it a Capture screenshots short video demonstration of Capture function in CATIA V5

Filed Under: How to Tagged With: capture image catia v5

Reader Interactions

Leave a Reply Cancel reply

Your email address will not be published. Required fields are marked *

Primary Sidebar

Buy me a coffee

Recent Posts

  • CATIA V5 Tutorial – Electric Motor Rotor Design
  • CATIA V5 Video Tutorial for Beginners #11 – Part Design
  • How to measure weight, volume and surface in CATIA V5
  • How to render a part or assembly in CATIA V5
  • Parameterization in assembly module using formula – CATIA V5 tutorial part 1

CATIA V5 Tutorial – Electric Motor Rotor Design

The new tutorial it is about a complex shaft design. It this link you can download the execution drawing for this part. You can find how to to read an execution drawing, how to use Stiffener command and some circular pattern.

CATIA V5 Video Tutorial for Beginners #11 – Part Design

The bellow video is about how you can create a simple part using simple commands in CATIA V5 Part Design module. For more questions or videos please check my YouTube Channel and also the CATIA video tutorial section from this blog. If you have some drawings I am open to draw for you in a […]

catia-assign-material-to-a-part

How to measure weight, volume and surface in CATIA V5

A simple but power-full tool is CATIA V5 is the Mass section, from where you can find very fast the main dimensions and weights of a part or of an assembly. To be more precise is very important to have assigned to each PartBody an material, You need to have on your interface active the […]

Footer

Recent Posts

  • CATIA V5 Tutorial – Electric Motor Rotor Design
  • CATIA V5 Video Tutorial for Beginners #11 – Part Design
  • How to measure weight, volume and surface in CATIA V5
  • How to render a part or assembly in CATIA V5
  • Parameterization in assembly module using formula – CATIA V5 tutorial part 1

Contact me

    Your Name (required)

    Your Email (required)

    Subject

    Your Message

    Enter the below code:

    captcha

    Categories

    • Assembly
    • CATIA tips and tricks
    • CATIA V5 Tutorials
    • CATIA V6 Tutorials
    • DMU Navigator
    • Drawing
    • General Structural Analysis
    • Generative Shape Design
    • How to
    • Knowledge Advisor
    • Part Design
    • Q&A
    • Video tutorials

    We use cookies to personalise content and ads, to provide social media features and to analyse our traffic. We also share information about your use of our site with our social media, advertising and analytics partners. Accept Read More
    Privacy & Cookies Policy

    Privacy Overview

    This website uses cookies to improve your experience while you navigate through the website. Out of these, the cookies that are categorized as necessary are stored on your browser as they are essential for the working of basic functionalities of the website. We also use third-party cookies that help us analyze and understand how you use this website. These cookies will be stored in your browser only with your consent. You also have the option to opt-out of these cookies. But opting out of some of these cookies may affect your browsing experience.
    Necessary
    Always Enabled
    Necessary cookies are absolutely essential for the website to function properly. This category only includes cookies that ensures basic functionalities and security features of the website. These cookies do not store any personal information.
    Non-necessary
    Any cookies that may not be particularly necessary for the website to function and is used specifically to collect user personal data via analytics, ads, other embedded contents are termed as non-necessary cookies. It is mandatory to procure user consent prior to running these cookies on your website.
    SAVE & ACCEPT