• Skip to primary navigation
  • Skip to main content
  • Skip to primary sidebar
  • Skip to footer

CATIA V5-V6 Tutorials

Tips and tricks, tutorials and workflow

  • CATIA tips and tricks
  • CATIA V5 Tutorials
    • Assembly
    • DMU Kinematics Simulator
    • DMU Navigator
    • DMU Space Analysis
    • Drawing
    • General Structural Analysis
    • Generative Shape Design
    • Part Design
  • How to
  • Video tutorials
  • About
  • Contact
You are here: Home / CATIA tips and tricks / Simplify your work using right commands in CATIA

Simplify your work using right commands in CATIA

01/23/2015 by Joe 5 Comments

I’m sure that almost all of us are not using the right commands to simply the work in CATIA. For me it’s important to find commands that save time, because I work with large assemblies and I must hide and show parts, create lines, point, curves, planes etc. and it’s important to find a way to apply a command and this command to do more than one simple hide of one point for example.

It’s important to take a look on my old articles written like Use efficent select tool in CATIA and CATIA Keyboard shortcuts where you can find useful information that can help you to use the right command to save time.

Today, I have in my mind two very used commands; Show and Hide, both of these commands are available on Tools -> Show/ Hide. With this commands you can Show/ Hide elements by type (All Points, Lines, Curves, Sketches, Surfaces, Planes, Volumes, Geometrical Sets, Bodies or Axis Systems with only two clicks.

show-hide-toolbars

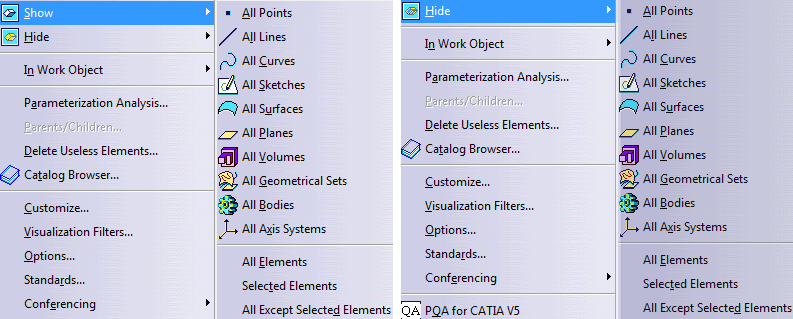
With these commands you can simply hide elements by type. If you want to show elements that were hidden you must press the Sway Visible space button.

Do you know other useful commands? Please tell us using leaving one comment.

Filed Under: CATIA tips and tricks Tagged With: CATIA Show Hide

Reader Interactions

Comments

  1. colin says

    01/22/2017 at 5:17 am

    hi Joe,
    did you find some efficient way to show or hide only one part in Assembly ?

    Reply
    • Joe says

      01/25/2017 at 4:58 pm

      Can explain more detailed?

      Reply
    • Brick says

      02/06/2017 at 7:48 pm

      Click on the part and type into Power Input: c:inversion.

      This inverts the selection. From there you can hide it. You must be in assembly for this to work.

      Reply
  2. Nhat Pham says

    03/03/2017 at 7:26 pm

    Hi Joe, my catia does not have this option under tool. Could you please show me how to turn it on?

    Thanks
    Best regards.

    Nhat Pham

    Reply
  3. Devin says

    11/13/2017 at 11:51 am

    i found “insert mold” is a very useful command.
    when you want to insert a command between a surface element and its children. you can use “insert mold”.

    Reply

Leave a Reply Cancel reply

Your email address will not be published. Required fields are marked *

Primary Sidebar

Buy me a coffee

Recent Posts

  • CATIA V5 Tutorial – Electric Motor Rotor Design
  • CATIA V5 Video Tutorial for Beginners #11 – Part Design
  • How to measure weight, volume and surface in CATIA V5
  • How to render a part or assembly in CATIA V5
  • Parameterization in assembly module using formula – CATIA V5 tutorial part 1

CATIA V5 Tutorial – Electric Motor Rotor Design

The new tutorial it is about a complex shaft design. It this link you can download the execution drawing for this part. You can find how to to read an execution drawing, how to use Stiffener command and some circular pattern.

CATIA V5 Video Tutorial for Beginners #11 – Part Design

The bellow video is about how you can create a simple part using simple commands in CATIA V5 Part Design module. For more questions or videos please check my YouTube Channel and also the CATIA video tutorial section from this blog. If you have some drawings I am open to draw for you in a […]

catia-assign-material-to-a-part

How to measure weight, volume and surface in CATIA V5

A simple but power-full tool is CATIA V5 is the Mass section, from where you can find very fast the main dimensions and weights of a part or of an assembly. To be more precise is very important to have assigned to each PartBody an material, You need to have on your interface active the […]

Categories

  • Assembly
  • CATIA tips and tricks
  • CATIA V5 Tutorials
  • CATIA V6 Tutorials
  • DMU Navigator
  • Drawing
  • General Structural Analysis
  • Generative Shape Design
  • How to
  • Knowledge Advisor
  • Part Design
  • Q&A
  • Video tutorials

Contact me

    Your Name (required)

    Your Email (required)

    Subject

    Your Message

    Enter the below code:

    captcha

    Recent Posts

    • CATIA V5 Tutorial – Electric Motor Rotor Design
    • CATIA V5 Video Tutorial for Beginners #11 – Part Design
    • How to measure weight, volume and surface in CATIA V5
    • How to render a part or assembly in CATIA V5
    • Parameterization in assembly module using formula – CATIA V5 tutorial part 1

    Contact me

      Your Name (required)

      Your Email (required)

      Subject

      Your Message

      Enter the below code:

      captcha

      Footer

      Recent Posts

      • CATIA V5 Tutorial – Electric Motor Rotor Design
      • CATIA V5 Video Tutorial for Beginners #11 – Part Design
      • How to measure weight, volume and surface in CATIA V5
      • How to render a part or assembly in CATIA V5
      • Parameterization in assembly module using formula – CATIA V5 tutorial part 1

      Contact me

        Your Name (required)

        Your Email (required)

        Subject

        Your Message

        Enter the below code:

        captcha

        Categories

        • Assembly
        • CATIA tips and tricks
        • CATIA V5 Tutorials
        • CATIA V6 Tutorials
        • DMU Navigator
        • Drawing
        • General Structural Analysis
        • Generative Shape Design
        • How to
        • Knowledge Advisor
        • Part Design
        • Q&A
        • Video tutorials

        We use cookies to personalise content and ads, to provide social media features and to analyse our traffic. We also share information about your use of our site with our social media, advertising and analytics partners. Accept Read More
        Privacy & Cookies Policy

        Privacy Overview

        This website uses cookies to improve your experience while you navigate through the website. Out of these, the cookies that are categorized as necessary are stored on your browser as they are essential for the working of basic functionalities of the website. We also use third-party cookies that help us analyze and understand how you use this website. These cookies will be stored in your browser only with your consent. You also have the option to opt-out of these cookies. But opting out of some of these cookies may affect your browsing experience.
        Necessary
        Always Enabled
        Necessary cookies are absolutely essential for the website to function properly. This category only includes cookies that ensures basic functionalities and security features of the website. These cookies do not store any personal information.
        Non-necessary
        Any cookies that may not be particularly necessary for the website to function and is used specifically to collect user personal data via analytics, ads, other embedded contents are termed as non-necessary cookies. It is mandatory to procure user consent prior to running these cookies on your website.
        SAVE & ACCEPT