• Skip to primary navigation
  • Skip to main content
  • Skip to primary sidebar
  • Skip to footer

CATIA V5-V6 Tutorials

Tips and tricks, tutorials and workflow

  • CATIA tips and tricks
  • CATIA V5 Tutorials
    • Assembly
    • DMU Kinematics Simulator
    • DMU Navigator
    • DMU Space Analysis
    • Drawing
    • General Structural Analysis
    • Generative Shape Design
    • Part Design
  • How to
  • Video tutorials
  • About
  • Contact
You are here: Home / CATIA V5 Tutorials / Assembly / How to use Sectioning in CATIA V5

How to use Sectioning in CATIA V5

01/30/2017 by Joe 3 Comments

In this article I will show you how to use Sectioning command in CATIA V5, how to export as a new Part to use also in Drawing and more.

This command is very useful when you work with large assemblies and you want only a part to make some measurements or to make screenshots for a presentation or something like that.

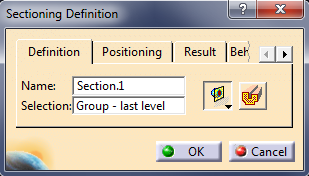
Sectioning command (Figure 1) it is available in Assembly Module of CATIA V5 and works for at least one part (with other words, if you want to make a section for one part, you can insert this part in a product to make some sections). This command it is available in Space Analysis Toolbar. When you press the button a Secondary window starts to be available. This window help you to see only the elements from section, excluding all other features of the assembly.

sectioning-command
Figure 1

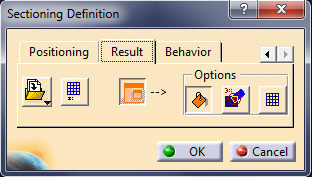
In the Figure 2 you can find the main window of this command, and 2 useful buttons, Section plane and Volume cut (for more explanations see the video from the button of this article).

main-sectioning-window-catia-v5
Figure 2 – Main Sectioning Window

On the Tab 2 – Positioning (Figure 3) you can select one of three axes that you want to achieve the section, and five button (Edit Position and Dimensions, Geometrical target, Positioning by 2/3 Selections, Invert normal and Reset position) that help you to be more precise when you want to create a section. (see the video for more info)

positioning-tab-catia-v5
Figure 3 – Positioning Tab

Result Tab have 6 buttons, all features of these will see in the below video. The most used feature here is the Clash Detection that finds for you all clashes from the assembly.

results-tab-catia-v5
Figure 4 – Result tab

The last tab, Behavior, help us to freeze a Section, or to select if you want to change something in it, to be automated updated the section or to be updated manually. This option it is very useful when you work with large assemblies that can crash you CATIA app if you use the Automatic Update feature.

behavior-tab-catia-v5
Figure 5 – Behavior tab

To edit a finished Section, you should navigate to the Tree at Application parent and just double click on it.

To help you to understand a little faster I made a video tutorial about how to use Sectioning command in to an assembly.

Filed Under: Assembly, How to Tagged With: sectioning catia v5

Reader Interactions

Comments

  1. Dev says

    10/27/2017 at 9:29 am

    Dear sir,
    My company have purchased a Catia v5 License (Only for assembly, part, drafting, sheet metal, weld design license). In that, when I select dynamic sectioning in assembly mode only 2 tabs will come i.e: positioning and result, other tabs that you have mentioned does not appear.
    The volume cut option is in result tab, but if I select it the sectioning will be in wire-frame mode, i.e: I cannot see the thickness of a plate (for example) but a hollow plate.
    Moreover if I click ok the section will go off and the model will appear in normal condition without section
    Why is this happens? Please help, is it due to license issue?

    Reply
    • Munich says

      07/02/2018 at 12:47 pm

      Hi Dev,

      yes – it is a license issue.
      We have a new license package with 3D Master (FTX) and Animated Product Review (PRX) – here we have 4 Tabs, without These packages we only have 2 Tabs.

      Reply
  2. Han says

    12/02/2021 at 9:06 am

    Hello,

    can i change the wire thickness of sectioning?

    Reply

Leave a Reply Cancel reply

Your email address will not be published. Required fields are marked *

Primary Sidebar

Buy me a coffee

Recent Posts

  • CATIA V5 Tutorial – Electric Motor Rotor Design
  • CATIA V5 Video Tutorial for Beginners #11 – Part Design
  • How to measure weight, volume and surface in CATIA V5
  • How to render a part or assembly in CATIA V5
  • Parameterization in assembly module using formula – CATIA V5 tutorial part 1

CATIA V5 Tutorial – Electric Motor Rotor Design

The new tutorial it is about a complex shaft design. It this link you can download the execution drawing for this part. You can find how to to read an execution drawing, how to use Stiffener command and some circular pattern.

CATIA V5 Video Tutorial for Beginners #11 – Part Design

The bellow video is about how you can create a simple part using simple commands in CATIA V5 Part Design module. For more questions or videos please check my YouTube Channel and also the CATIA video tutorial section from this blog. If you have some drawings I am open to draw for you in a […]

catia-assign-material-to-a-part

How to measure weight, volume and surface in CATIA V5

A simple but power-full tool is CATIA V5 is the Mass section, from where you can find very fast the main dimensions and weights of a part or of an assembly. To be more precise is very important to have assigned to each PartBody an material, You need to have on your interface active the […]

Categories

  • Assembly
  • CATIA tips and tricks
  • CATIA V5 Tutorials
  • CATIA V6 Tutorials
  • DMU Navigator
  • Drawing
  • General Structural Analysis
  • Generative Shape Design
  • How to
  • Knowledge Advisor
  • Part Design
  • Q&A
  • Video tutorials

Contact me

    Your Name (required)

    Your Email (required)

    Subject

    Your Message

    Enter the below code:

    captcha

    Recent Posts

    • CATIA V5 Tutorial – Electric Motor Rotor Design
    • CATIA V5 Video Tutorial for Beginners #11 – Part Design
    • How to measure weight, volume and surface in CATIA V5
    • How to render a part or assembly in CATIA V5
    • Parameterization in assembly module using formula – CATIA V5 tutorial part 1

    Contact me

      Your Name (required)

      Your Email (required)

      Subject

      Your Message

      Enter the below code:

      captcha

      Footer

      Recent Posts

      • CATIA V5 Tutorial – Electric Motor Rotor Design
      • CATIA V5 Video Tutorial for Beginners #11 – Part Design
      • How to measure weight, volume and surface in CATIA V5
      • How to render a part or assembly in CATIA V5
      • Parameterization in assembly module using formula – CATIA V5 tutorial part 1

      Contact me

        Your Name (required)

        Your Email (required)

        Subject

        Your Message

        Enter the below code:

        captcha

        Categories

        • Assembly
        • CATIA tips and tricks
        • CATIA V5 Tutorials
        • CATIA V6 Tutorials
        • DMU Navigator
        • Drawing
        • General Structural Analysis
        • Generative Shape Design
        • How to
        • Knowledge Advisor
        • Part Design
        • Q&A
        • Video tutorials

        We use cookies to personalise content and ads, to provide social media features and to analyse our traffic. We also share information about your use of our site with our social media, advertising and analytics partners. Accept Read More
        Privacy & Cookies Policy

        Privacy Overview

        This website uses cookies to improve your experience while you navigate through the website. Out of these, the cookies that are categorized as necessary are stored on your browser as they are essential for the working of basic functionalities of the website. We also use third-party cookies that help us analyze and understand how you use this website. These cookies will be stored in your browser only with your consent. You also have the option to opt-out of these cookies. But opting out of some of these cookies may affect your browsing experience.
        Necessary
        Always Enabled
        Necessary cookies are absolutely essential for the website to function properly. This category only includes cookies that ensures basic functionalities and security features of the website. These cookies do not store any personal information.
        Non-necessary
        Any cookies that may not be particularly necessary for the website to function and is used specifically to collect user personal data via analytics, ads, other embedded contents are termed as non-necessary cookies. It is mandatory to procure user consent prior to running these cookies on your website.
        SAVE & ACCEPT