• Skip to primary navigation
  • Skip to main content
  • Skip to primary sidebar
  • Skip to footer

CATIA V5-V6 Tutorials

Tips and tricks, tutorials and workflow

  • CATIA tips and tricks
  • CATIA V5 Tutorials
    • Assembly
    • DMU Kinematics Simulator
    • DMU Navigator
    • DMU Space Analysis
    • Drawing
    • General Structural Analysis
    • Generative Shape Design
    • Part Design
  • How to
  • Video tutorials
  • About
  • Contact
You are here: Home / CATIA V5 Tutorials / DMU Navigator / Improve your workflow with DMU Navigator

Improve your workflow with DMU Navigator

09/19/2014 by Joe 1 Comment

Personally I use DMU Navigator for a single reason, to use the command Translation or Rotation in .CATProduct files. With this command you can select lines, points, axis and planes to apply translate, rotate, position or transformations to any components.

When you click on the Translation or Rotation icon you will see for tabs that are available:

  1. to translate components, see Translating a Component;
  2. to rotate components, see Rotating Components;
  3. to position components, see Positioning Components;
  4. to apply transformations to components, see Applying a Transformation.

1. Translating Components in CATIA using DMU Navigator

To do a translation for a component you have two solutions, by entering translation values or by selecting geometric elements to define a translation direction.

Follow steps to do for Translating components in CATIA

1.1. Click the Translation or Rotation The 3D compass is automatically snapped onto the referential axis of the father part (the Product axis system). The Move dialog box is displayed. Either you specify an offset value between the element and the x, y or z axis, or you select a geometric element to define the direction you need. The move is defined in terms of an offset along x, y or z axes.

Translating components

1.2. Select the component to be translated. The 3D compass is automatically snapped onto the referential axis of Product, the father.

1.3. To define the translation, enter an offset value for x, y or z in the Offset boxes e.g. 100 mm for y.

1.4. Click Apply.

1.5. Click Invert to reverse the previous operation and translate the component in the opposite direction. The translation is reversed.

1.6. Click OK to close the dialog box.

1.7. Repeat steps 1.1 and 1.2; this time uncheck the Relative move option.

2. Rotating Components in CATIA using DMU Navigator

To do a rotate you must enter the rotation angle and specifying the rotation axis for a component or by selecting a geometric element to define the rotation axis and entering the angle value.

Follow steps to do for Rotating components in CATIA

2.1. Click the Translation or Rotation icon.

2.2. Click the Rotation tab.

Rotating components
Rotating components

2.3. Select the component to be rotated

2.4. Click one of the Axis options to specify the axis of rotation, e.g. the y axis.

2.5. Enter an angle of rotation in the Angle box, e.g. 90deg.

2.6. Click Apply to rotate the component. The selected component is rotated accordingly.

2.7. You can click Apply as many times as you wish to rotate the component to the desired position.

2.8. Click OK to close the dialog box.

 3. Positioning Components in CATIA using DMU Navigator

To put in position a component you must enter the position values and specifying the axis values or by selecting a geometric element to define the rotation axis and entering the angle value.

Follow steps to do for Positioning components in CATIA

3.1. Click the Translation or Rotation icon.

3.2. Click the Position tab.

Positioning components

3.3. Select the component to be positioned.

3.4. Enter values for x, y and/or z to define the position e.g. enter 0.

3.5. Specify angle values for RotX (e.g. 0deg), RotY (e.g. 50deg) and RotZ (e.g. 0deg).

3.6. Click Apply. The selected component is positioned accordingly.

3.7. Click OK when satisfied.

4. Applying a Transformation in CATIA using DMU Navigator

To apply a transformation you must enter the position values and specifying the axis angle values or to by selecting a geometric element to define the rotation axis and entering the angle value.

Follow steps to do for Applying a Transformation in CATIA

4.1. Click the Translation or Rotation icon.

4.2. The Move dialog box is displayed.

Applying a Transformation

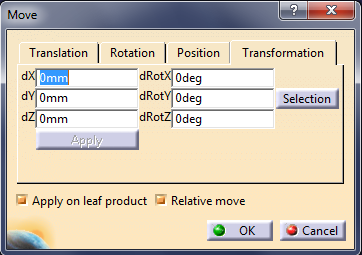
4.3. Click the Transformation tab.

4.4. Select the component to be applied a transformation.

4.5. Enter values for dx (i.e. 0mm), dy (i.e. 100mm)  and dz (i.e.0mm)  to define the translation.

4.6. Specify angle values for dRotX (i.e. 0deg), dRotY (i.e. 50deg) , dRotZ (i.e. 0deg) to define the rotation.

4.7. Click Apply. The selected component is positioned accordingly (both translation and rotation are applied to the component).

You can manipulate components with Compass modifying their parameters, but this method will be detailed in another article.

Filed Under: DMU Navigator, How to Tagged With: DMU navigator, how to use

Reader Interactions

Comments

  1. Zhen says

    11/11/2022 at 12:01 pm

    how to insert the icon into toolbars? couldn’t find it.

    Reply

Leave a Reply Cancel reply

Your email address will not be published. Required fields are marked *

Primary Sidebar

Buy me a coffee

Recent Posts

  • CATIA V5 Tutorial – Electric Motor Rotor Design
  • CATIA V5 Video Tutorial for Beginners #11 – Part Design
  • How to measure weight, volume and surface in CATIA V5
  • How to render a part or assembly in CATIA V5
  • Parameterization in assembly module using formula – CATIA V5 tutorial part 1

CATIA V5 Tutorial – Electric Motor Rotor Design

The new tutorial it is about a complex shaft design. It this link you can download the execution drawing for this part. You can find how to to read an execution drawing, how to use Stiffener command and some circular pattern.

CATIA V5 Video Tutorial for Beginners #11 – Part Design

The bellow video is about how you can create a simple part using simple commands in CATIA V5 Part Design module. For more questions or videos please check my YouTube Channel and also the CATIA video tutorial section from this blog. If you have some drawings I am open to draw for you in a […]

catia-assign-material-to-a-part

How to measure weight, volume and surface in CATIA V5

A simple but power-full tool is CATIA V5 is the Mass section, from where you can find very fast the main dimensions and weights of a part or of an assembly. To be more precise is very important to have assigned to each PartBody an material, You need to have on your interface active the […]

Footer

Recent Posts

  • CATIA V5 Tutorial – Electric Motor Rotor Design
  • CATIA V5 Video Tutorial for Beginners #11 – Part Design
  • How to measure weight, volume and surface in CATIA V5
  • How to render a part or assembly in CATIA V5
  • Parameterization in assembly module using formula – CATIA V5 tutorial part 1

Contact me

    Your Name (required)

    Your Email (required)

    Subject

    Your Message

    Enter the below code:

    captcha

    Categories

    • Assembly
    • CATIA tips and tricks
    • CATIA V5 Tutorials
    • CATIA V6 Tutorials
    • DMU Navigator
    • Drawing
    • General Structural Analysis
    • Generative Shape Design
    • How to
    • Knowledge Advisor
    • Part Design
    • Q&A
    • Video tutorials

    We use cookies to personalise content and ads, to provide social media features and to analyse our traffic. We also share information about your use of our site with our social media, advertising and analytics partners. Accept Read More
    Privacy & Cookies Policy

    Privacy Overview

    This website uses cookies to improve your experience while you navigate through the website. Out of these, the cookies that are categorized as necessary are stored on your browser as they are essential for the working of basic functionalities of the website. We also use third-party cookies that help us analyze and understand how you use this website. These cookies will be stored in your browser only with your consent. You also have the option to opt-out of these cookies. But opting out of some of these cookies may affect your browsing experience.
    Necessary
    Always Enabled
    Necessary cookies are absolutely essential for the website to function properly. This category only includes cookies that ensures basic functionalities and security features of the website. These cookies do not store any personal information.
    Non-necessary
    Any cookies that may not be particularly necessary for the website to function and is used specifically to collect user personal data via analytics, ads, other embedded contents are termed as non-necessary cookies. It is mandatory to procure user consent prior to running these cookies on your website.
    SAVE & ACCEPT